
If You want to take screenshot on Mac, It is different than taking screenshot on PCs having Windows OS. There are multiple commands to take screenshots of different types in Mac. I’ll share a total of five different commands which You can use to capture screen on Your Mac.
Let’s dive in
If You want the Screenshot Image file
If You want the Screenshot image file to be saved on Your desktop then follow the instructions given below.
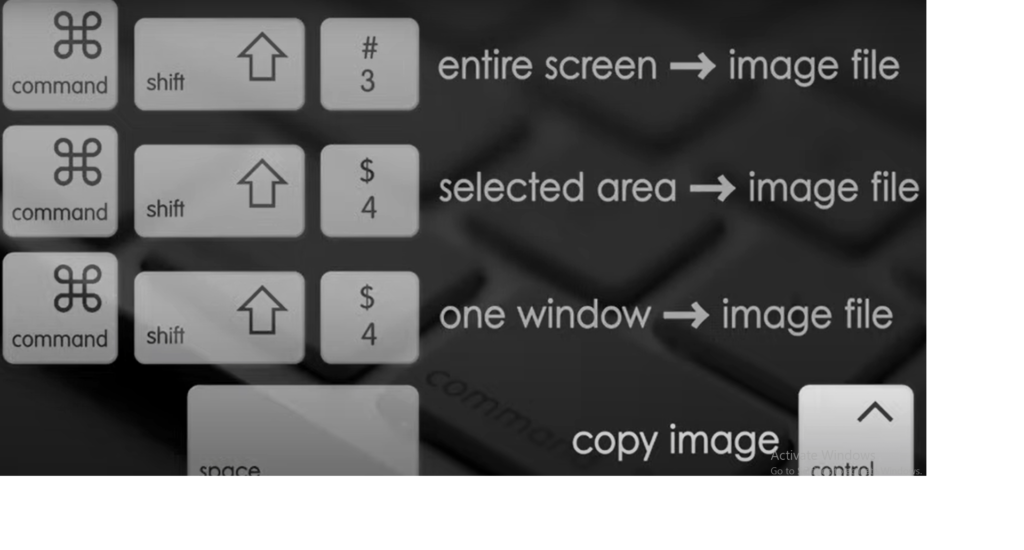
- Press (Command) + (Shift) + (3) simultaneously to take Screenshot of any image on Your Mac.
- The Image will automatically be saved on Your desktop so You don’t need to do anything.
- You can edit this image further using other apps if needed.
If You don’t want the Screenshot Image file
If You want to take control of Your image while taking screenshot and paste it somewhere else. This command will help You doing this.
- Press (Shift) + (Control) + (Command) + (3) simultaneously to take screenshot and copy the image as well.
- Now You can paste the image at Your target location. Use (Control) + (V) to paste the image You have taken the screenshot of.
If You want just a Portion of Image
The command I’m going to provide is useful for taking the screenshot of just a portion of an image. This command will activate a handy cropping tool that works while taking the screenshot. Do it Yourself by following the instructions given below.
- Press (Command) + (Shift) + (4) simultaneously to take screenshot and activate the cropping tool as well.
- Now drag the selection arrow on the portion of image required.
- As soon as You are done with dragging, The selected portion will automatically be cropped and the image will be saved on Your desktop.
If You don’t want to save Portion of Image
If You want to take screenshot and crop that image but don’t want to save it on Your desktop. But want to take control of the image and paste it at Your target location, This command will help.
- Press (Shift) + (Control) + (Command) + (4) simultaneously to take screenshot, activate the cropping tool, and take control of the cropped image.
- Once You have selected the portion of image to be cropped, The screenshot of cropped image will be copied to Your clipboard.
- Now You can paste this screenshot image at Your target location by using (Control) + (V).
Take Screenshot of a Target Window
The command I’m going to share is capable of taking screenshot of any targeted window on Your Mac screen. Let’s learn
- Press (Command) + (Shift) + (4) simultaneously and after that hit (Space Tab). It will activate a camera icon which You can move to select the targeted window.
- When this icon will touch the window, It will be highlighted. Move the icon to the targeted window.
- Now Click to take screenshot of a particular window which You have selected. The screenshot will be saved on Your desktop.
Use of Additional Keys
As we are discussing about taking screenshot of target window, You can use some additional keys to use some important features.
Use of (Control) key
Press (Control) + (Command) + (Shift) + (4) simultaneously and hit (space) after that to take control of screenshot. Now You can paste it at Your targeted location. Use (Control) + (v) to paste the screenshot.
Use of (Space) Key
Press (Command) + (Shift) + (4) and hit (Space Tab) to activate camera icon, Now hold down (Space Tab) again to drag the area somewhere else.
Use of (Shift) Key
Press (Command) + (Shift) + (4) and hit (Space Tab) to activate camera icon, Now hold down (Shift) to drag the one corner of the area.
Use of (Option) Key
Press (Command) + (Shift) + (4) and hit (Space Tab) to activate camera icon, Now hold down (Option) key to lock the area.
Video Tutorial on Taking Screenshot on mac
Take Screenshot on mac Online
If the keys of You Mac not working properly and You want to take screenshot on mac without using any keys then our Screenshot Online tool is here to help. You can take screenshots of any screen using this tool. Find the Tool here.